Saturday 29 August 2020

[#Blogged] - Salesforce Administrator Guide: Propelling your Career Forward - Part 5


Part 5: The Lowdown on Salesforce Permissions

In Part 5 of our series Salesforce Administrator Guide: Propelling your Career Forward, let’s take a few minutes to discuss Salesforce Permissions. To be clear, Salesforce permissions run deep and wide, and you will eventually need to put in a decent amount of time to become an expert at this, however, today we’re just going to go over some basic terms to make sure you understand the gist of things.  Let’s dive in!


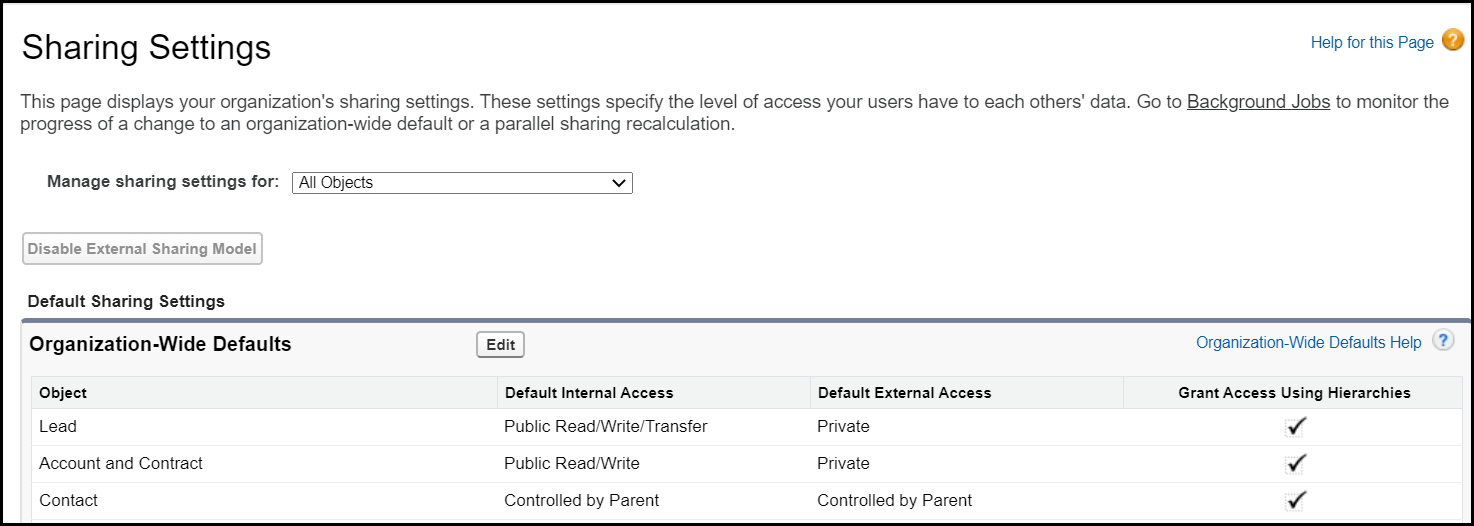
Image: OWD and Sharing Settings


Organization-Wide Defaults (OWD) - This controls the record level access for the entire org, on whether records should be privately viewed or not. For example, you may not want Sales reps to see each others’ Opportunities, so you can make the Opportunity object private.


Role Hierarchy - As you create users in Salesforce, you determine which Role they may be in, such as Sales rep or Services rep, for example. Specific roles can be nested under others, such as the Sales Rep, which looks up to the Sales Manager, which looks up to the VP of Sales. You can grant record access based on Role Hierarchies to ensure a Manager can always see his rep’s records. 


Sharing Rules - These are another way to work within the OWD you have set, to allow users to see certain records. You can set up Sharing Rules to work with Public Groups that you have established, in order to grant access to certain records with specific criteria. This is a great way to share records across departments.


Manual Sharing - Manual sharing is an option for individuals to share individual records. Maybe your sales rep only needs to share a record with the Service rep once or twice a month, and they only need to see one or two at a time. This would be a good way to allow record sharing without the setup involved for sharing rules.


Field Level Security - Also known as FLS, field level security is where you can allow certain profiles to have access to a field. You may find that some fields should remain hidden from lower level end users, or reserved for a specific department, such as Finance. This allows you to limit clutter and unauthorized permission.


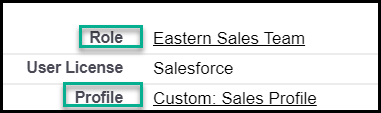
Image: The Role and Profile are located on the User Record


Profiles - Each user record has a profile, which houses object and system permissions. These are separate from roles, in that these give what is known as “CRED” access: Create, Read, Edit, or Delete. This allows your user to take those actions on records, and should be thoughtfully considered before doling out. 


Permission Sets - The idea of Profiles is to give users that need the same permissions their access in a way that’s easiest for you as an Admin. You simply don’t want too many profiles. However, you may find that there are permissions that may be needed for a select group of users that are very specific to an object or setting that others should not have. A permission set can be created and added to the user record to grant that access.


That’s a lot - and only scratching the surface. If you’re looking for a pretty awesome trailhead on this topic, check out the Data Security module.


Wednesday 19 August 2020

[#Blogged] - Salesforce Administrator Guide: Propelling your Career Forward - Part 4

 We all love Salesforce, but one of the most confusing things about Salesforce may be trying to navigate through all of the places to find what you’re looking for. It can absolutely drive you crazy to see a record or a setting, and find yourself unable to locate it once more, just a few minutes later. Well, I’m here to help you sort it out! In Part 4 of my series Salesforce Administrator Guide: Propelling your Career Forward, I’m going to talk about how to navigate through Salesforce efficiently and some things you can do to make it fit nicely into your daily tasks. 


Part 4: How to Navigate through Salesforce Efficiently

Setup Menu: How to get there and how to use it

The Setup menu is where you essentially, as an admin, control the ‘backend’ of your Salesforce instance. This is where page layouts, user permissions, and other tools are easily available for you to access and customize. 


In order to access your Setup menu, you must select the Setup ‘wheel’ in the top right corner of your layout. You can then select Setup.


Once you select Setup, you are taken to the Setup screen, where you’ll see a tab called “Home”. The Home tab is where you can use the Quick Find search bar to locate the Lightning App Builder, Profiles and User records, as well as anything else that may require setting up or adjusting.


Under Setup, there is also a tab called “Object Manager”, which houses each Salesforce object, both standard and custom. You can then select the object and access information specific to each one, such as page layouts and record types, fields for each object, and even validation rules. This is also where you would create any new custom fields for that object, as well.


The App Launcher: What does it do?

While Setup is the ‘backend’ of Salesforce, the Apps are what your end users will have the most access to, and how you navigate through customer data. Apps are collections of tabs and objects, which contain collections of records. For example, you may have two teams, such as Sales and Services, with different needs. Sales may need to see Accounts, Opportunities, and Leads, but Services may need to see Cases, Accounts, and Reports. You can create two different apps to prevent them from too much clutter on their screens. They each can navigate through their tabs, and learn that to get a list of recently visited accounts, they can select their Accounts tab for that list view. 


If you’re in Setup, but need to navigate back to records, you will select the App Launcher icon in the left corner. From there, you can select the App you’re looking for, or even just search for a specific tab, such as “Accounts”.


Understanding how to navigate between those two worlds of Salesforce will make a huge difference in your day to day functioning. Take time to explore Setup a little more, and you’ll be a whiz in no time!


Thursday 6 August 2020

[#Blogged] - Salesforce Administrator Guide: Propelling your Career Forward - Part 3

Part 3: 3 Benefits of Joining Community Groups 


So, you’re focusing on furthering your Salesforce Admin career -- that’s great! It’s easy to get inundated by everything Salesforce has to offer, and the pressure to “keep up” with it all. But just relax! You’re not going to learn it all in a day, and there is more to your Admin career than the hard skills themselves. There is a whole network of others who are following the same path as you, and others who have gone before. Why not tap into that network to help you stay on top of your Admin game? 


If you have not heard about Community Groups, you’re in for a treat! This does not mean “Community Cloud” groups, but rather user groups of Salesforce professionals in your area. They are a great way to connect with others locally, and can provide resources to help you along this journey you’re on. They usually meet pretty regularly, and offer events such as webinars, and “Salesforce Saturdays” where you can meet and work through your Salesforce issues together. If you’re stuck on a major issue, collaborating with others who have a variety of experience can help you think outside of the box and find that perfect solution you’re looking for. The positives of the Community group doesn’t just stop there - read on to see more benefits and how to sign up today! 


3 Benefits to Joining your Local Community Group


  1. Access to local Events - This is a huge benefit. It can be easy to get caught in your bubble of work, and the next thing you know, you’re not really expanding your horizons. Local events can range from guest speakers, to local companies offering apps on the AppExchange to explorations of new features. And they’re tailored to a smaller crowd, which can give you a chance to ask those important questions.


  1. Find a Mentor - Especially when starting out as an admin, it can feel like you’re not sure of the path you’d like to take or even where to get started at times. Finding a mentor can be a great way to work with someone from your area who understands the local industry and can offer advice on the best ways to propel yourself forward.


  1. Networking with Others - Your local community group also allows for connecting with others nearby, as well. These connections can be great for future career options and building relationships early, as you stay in touch over the course of your growth. You can also find awesome people to join your team, as well. 


How to Sign Up

To find out more about your local Community Group, login to your Trailhead site, and navigate to the “Community” drop down, where you can see “Community Groups”. 


Once you’re there, you can easily Sign up and search for the city you live in (or one near you) to see about events they’re hosting. Signing up only takes 30 seconds, and you’re in!


This is a great opportunity to help you expand your growth as you’re on this journey of being a Salesforce Admin. What are you waiting for?!? Go Join today!