Showing posts with label Salesforce Apex Programming Essential. Show all posts

Wednesday, 18 September 2019

[#Blogged] - Change Event Object Support in Salesforce

Change events are available for all custom objects defined in your Salesforce org and few of standard objects. 

The following standard objects support change events.

  • Account (including Person Account)
  • AccountContactRole
  • Asset
  • Campaign
  • CampaignMember
  • CampaignMemberStatus
  • Case
  • Contact
  • Contract
  • ContractLineItem
  • Entitlement
  • Event
  • EventRelation
  • Lead
  • ListEmail
  • LiveChatTranscript
  • Opportunity
  • OpportunityContactRole
  • Order
  • OrderItem
  • Product2
  • Quote
  • QuoteLineItem
  • ServiceContract
  • Task
  • TaskRelation
  • User (including partner users)

Thursday, 12 April 2018

[#Blogged] First Code back in 2014 - Attachment Upload in Salesforce.

Hey #Ohana,

I am amazed to share the First apex class I wrote back in 10/17/2014.

Apex class used to upload an attachment referencing Parent Id in the Visualforce Page.
Salesforce attachment represents a file that a User has uploaded and attached to a parent standard or custom object record. If the user has created permission on a parent object, then only he/she can able to attach an attachment to the parent object.

You can have a look at the amazing video by Jeff Douglas

When Did you code first time and which functionality was that?

Saturday, 17 March 2018

[#Blogged] How to capture Facebook leads in Salesforce?

Business Requirement - Client promotes his business on Facebook and would like to use Salesforce to store leads and contact them in future. What would be the solution to go ahead with it?

Solution- Rest API Integration/Data upload via Data Loader/Salesforce Lead Capture.

Let's go ahead easy Automation way, Salesforce Lead Capture.
Automate leads from Facebook Lead Ads directly into Sales Cloud
Lead Capture for Sales Cloud allows brands running demand generation campaigns on Facebook using Lead Ads to automate lead form submissions directly into Sales Cloud and map them to Lead Objects.

Screen Shot 2018-03-16 at 7.47.37 PM

This App is provided by Salesforce.

Let's start configuring it in our Developer Org.

Login to App-Exchange and download an app from the link below:

https://appexchange.salesforce.com/appxlistingdetail?listingId=a0N3A00000DrzmfUAB.

Install for Admins only, as we would need to setup it correctly. You can decide it according to your business requirements.

Screen Shot 2018-03-16 at 7.49.29 PM.png

After installing an Appexchange, we usually look in the Application tab for the app installed.

You can find a custom tab created as 'Lead Capture' in the All tabs in Salesforce.

Please authenticate your facebook account which has your business page.Make sure you are admin of the facebook page you wish to automate leads.

Screen Shot 2018-03-16 at 8.05.45 PM.png

Please select which business page(Facebook) you would like to link it.

You would be shown some active forms which fetch data from the Facebook business page.

Screen Shot 2018-03-16 at 8.05.56 PM.png

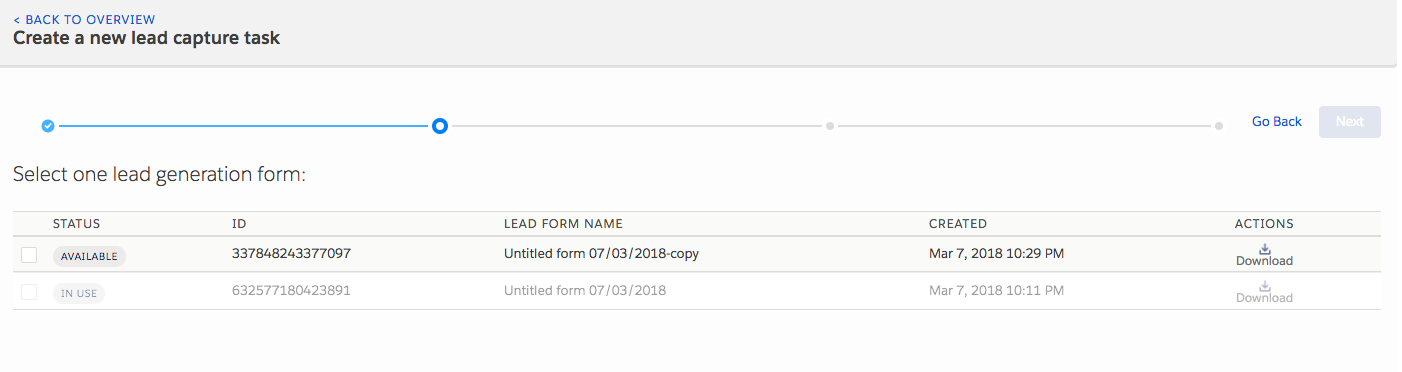
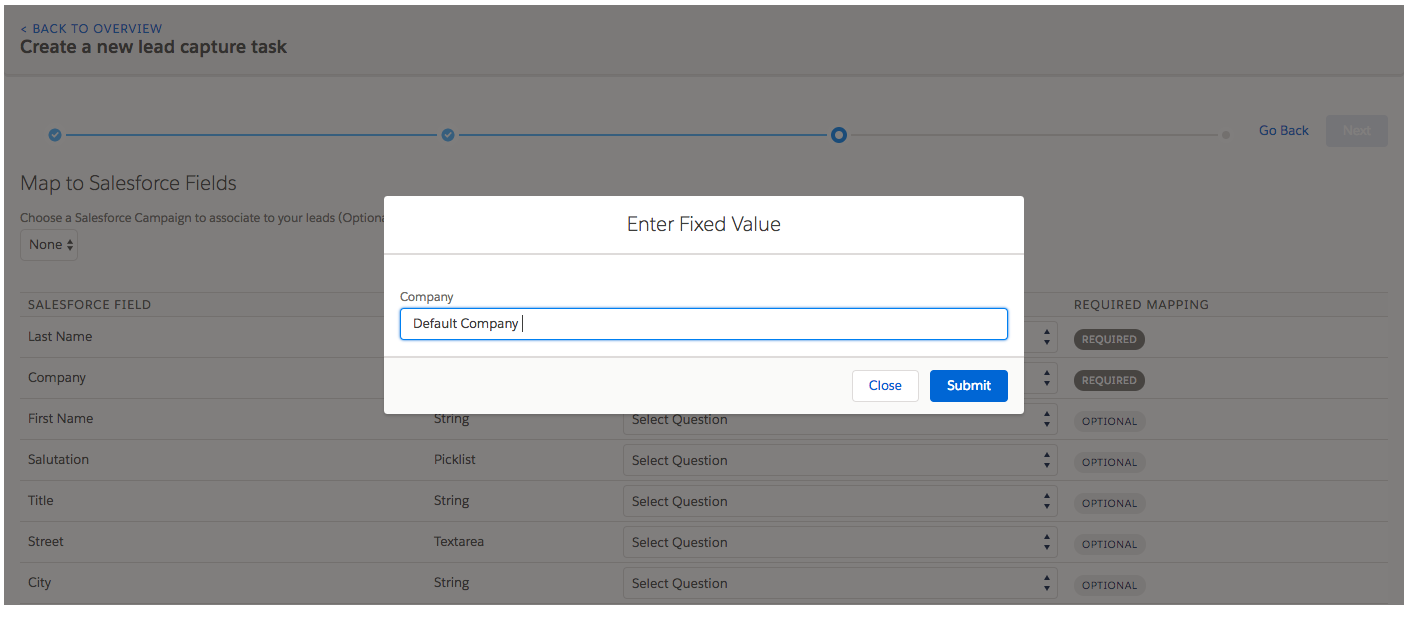
Map Form fields with Salesforce lead fields (Standard and Custom Fields).

Screen Shot 2018-03-16 at 8.06.05 PM

You can use Fixed Value for some required fields in the lead object.

Screen Shot 2018-03-16 at 8.06.30 PM

So whenever new lead would be submitted, It would be automatically transferred to Salesforce.

Screen Shot 2018-03-16 at 8.06.41 PM.png

How to differentiate between Normal leads and leads which would be inserted into Facebook?

Salesforce Lead Capture used an External ID field as Facebook lead ID ( External ID field is used to avoid duplicates in the records as it performs as a unique key ). You won't find it in the page layout but you can add it there.

Create a list view and in the criteria, you can use Facebook Lead Id not equal to NULL( Facebook_lead_id__c != NULL).List view would show all the leads which would be coming from Facebook.

As we installed the App in the developer org, How to test it if we configured it correct or wrong and lead is going correctly in Salesforce?

Thanks to Facebook, we have a Lead Ads Testing Tool.https://developers.facebook.com/tools/lead-ads-testing

Thursday, 1 March 2018

[#Blogged]Transient Keyword in Salesforce

Declaring variables as transient reduces view state size. A common use case for the transient keyword is a field on a Visualforce page that is needed only for the duration of a page request, but should not be part of the page's view state and would use too many system resources to be recomputed many times during a request.
The transient variables are not passed to view state and therefore not stored in View State.

difference between transient instance variable and a static variable?

Static methods, variables, or initialization code are associated with a class and are only allowed in outer classes.
When you declare a method or variable as static, it's initialized only once when a class is loaded. All static member variables in a class are initialized before any object of the class is created.  Indeed they aren't transmitted as part of the view state for a Visualforce page.
Using static variables will cause only one instance of the variable to be loaded when the application loads and that variable will not go out of memory until the app is closed.  It holds information that is common to all instances on a class and It is shared between them instead of being created a new with each instance.
while
Transient keyword to declare instance variable that can not be saved and should not be transmitted as part of view state for visual force page.
Basically, View State is an encrypted, hidden field on a Visualforce page that keeps track of Apex controller state & Visualforce page state between server requests. This field is only generated when there is a tag present on a page.

ViewState is only used on a single page that handles postbacks. Once you redirect to the new page, the ViewState is lost.


The Whole Process of Calling is like this :

A. URL Requested
B. Apex Controller Instantiated on Server
C. Controller State Serialized & Encrypted to View State
D. Page Markup Sent to Browser & Rendered
E. View State Decrypted & Deserialized (for Postbacks)

View State Automatically keeps track of field values for you and Allows for easy AJAX functionality. In order to remove View State Error, we use 4 methods.

A. Reduce Number of Components
B. Use the transient Keyword
C. Use JavaScript Remoting
D. Use the Streaming API


References: https://developer.salesforce.com/docs/atlas.en-us.apexcode.meta/apexcode/apex_classes_keywords_transient.htm

Tuesday, 20 February 2018

[#Blogged]Granular Locking in Salesforce

Granular Locking in Salesforce

The system employs additional logic to allow multiple updates to proceed simultaneously if there is no hierarchical or other relationship between the roles or groups involved.

For example: if you trying to edit the user details but on the other hand automated process is already doing that then you are not allowed to edit.

for this we use granular locking, this will not lock the entire table but only specific data.

What are the key advantages of granular locking?

1) Groups that are in separate hierarchies can be manipulated concurrently

2) Public groups and roles that do not include territories can be manipulated concurrently

3) Users can be added concurrently to territories and public groups

4) User provisioning can occur in parallel

5) A single-long running process, such as a role delete, only blocks a small subset of operations

Benefits to customers:

Customers who frequently experience locking that restricts their ability to manage manual and automated group maintenance operations.
Enable granular locking, which attempts to lock only the modified portions of the table. This can improve the performance of the following items:
1) Adding/deleting/transferring user from a territory
2) Re-parent a territory
3) Create or delete a territory within a hierarchy
4) Adding or removing a forecast manager


Check the below link for more information
https://resources.docs.salesforce.com/sfdc/pdf/draes.pdf

Tuesday, 6 February 2018

[#Blogged] Quick Start: Heroku Connect - #Trailhead Badge157

Heroku is a container-based cloud Platform as a Service (PaaS). Developers use Heroku to deploy, manage, and scale modern apps. Our platform is elegant, flexible, and easy to use, offering developers the simplest path to getting their apps to market.
Heroku is fully managed, giving developers the freedom to focus on their core product without the distraction of maintaining servers, hardware, or infrastructure. The Heroku experience provides services, tools, workflows, and polyglot support—all designed to enhance developer productivity. 

Lets Quick Start on Heroku with the Help of Trailhead.

Prerequisites:

Heroku account
  • Before Deploying an application to Heroku, make sure you have an active Heroku Account.If not, Navigate to https://signup.heroku.com and create a Heroku account.
Contact Custom field  
  • Add a new field to the Contact Object:
  • In Setup, click the Object Manager tab next to the Home tab.
    Click the Contact object.
    Click Fields & Relationships.
    Click New.
    For Data Type, select Text, and click Next.
    Complete the custom field as follows:
    Field Label: External Phone ID
    Length: 10
    Field Name: External_Phone_ID
    Unique: Select Do not allow duplicate values
    External ID: Select Set this field as the unique record identifier from an external system
    Click Next.
Deploy an Application
  1. Login into Heroku Account.
  2.  Deploy the sample Phone Change Application.
  3. Select the United States as the Region, then click Deploy App.
  4. After the app has been deployed, you can manage it in the Heroku Dashboard by clicking the Manage App button and view the app by clicking the View button.

Provision the Heroku Postgres Add-on and Provision the Heroku Connect Add-on

Provision the Heroku Postgres Add-on
Connect, Use, and Develop
Databases are multi-ingress: use them from any cloud, PaaS, or your local computer. It is easy to connect with common languages & frameworks including Rails, Django, PHP, and Java: configuration strings are generated for them automatically.
Scale and Grow
Scale vertically by choosing from a range of plans. Plans differ based on the size of their hot-data-set, the portion of data available and optimized on-the-fly in high-speed RAM. When the time comes, scale horizontally by adding read-only followers that stay up-to-date with the master database.
Starter Steps :

  1.  Click the Manage App button to visit the Heroku Dashboard and click on your new application.
  2.  Click the Resources tab.
  3.  In the search area in the Add-ons section, type Heroku Postgres, click Enter and then click Provision. 
Provision the Heroku Connect Add-on
Seamless Heroku and Salesforce data synchronization
Heroku Connect makes it easy for you to build Heroku apps that share data with your Salesforce deployment. Using bi-directional synchronization between Salesforce and Heroku Postgres, Heroku Connect unifies the data in your Postgres database with the contacts, accounts and other custom objects in the Salesforce database. Easily configured with a point and click UI, it’s simple to get the service up and running in minutes – no coding or complex configuration is required. 
Starter Steps :
  1.  Click the Manage App button to visit the Heroku Dashboard and click on your new application.
  2.  Click the Resources tab.
  3.  In the search area in the Add-ons section, type Heroku Connect, click Enter and then click Provision 
Heroku Connect locates the Heroku Postgres database that you provisioned in the previous step.
  • Click Next and then click Authorize
  • Now set up Heroku Connect.
Authorize Heroku Connect to access your Salesforce Org. Log in to Salesforce with your Trailhead Playground /Developer Org credentials you collected above.
Create a mapping between the Contact object in Salesforce and a table in the Heroku Postgres database.

  • In Heroku, click Create Mapping. Select the Contact object.
    In the Database -> Salesforce section, select the Write database updates to Salesforce using -- None -- as the unique identifier option and choose External_Phone_ID__c from the dropdown list.
  • Click Save.When you've completed the mapping setup, the data begin synchronizing.  
Our application is now syncing (bidirectionally) a subset of the Contact object in Salesforce with a new table in the Heroku Postgres database associated with your app.
When the syncing is complete, open your Heroku app in a new browser tab, by entering http://APP_NAME.herokuapp.com and replacing APP_Name with your app name.

Complete the form and Since you had previously set up the bidirectional sync with Salesforce using Heroku Connect, this should also automatically update the contact record in Salesforce.

References :
 https://elements.heroku.com/addons/heroku-postgresql
https://trailhead.salesforce.com/projects/quickstart-heroku-connect/steps/qs-heroku-connect-1

Saturday, 26 August 2017

[#Blogged] Time To Upvote -Series (Part 2)

Here we have some idea's which need to be upvoted :
IDEA 1 - 
Enable drag & drop functionality for lightning Calendar
Salesforce classic calendar supports drag and  drop off events.
Lightning has a much more dynamic user interface, but it still lacks this basic functionality which keeps many customers from managing their calendars entirely in Salesforce.
Upvote

IDEA 2 -
Allow new chats to load in the background, without monopolizing agent focus
Current behavior: When a new chat is accepted, the new chat monopolizes the agent focus, and the agent is not able to continue chatting or performing after-chat work. It brings the agent to the new chat tab, even though it takes ~ 5 seconds to load all 3 chat sub-tabs (chat, contact, case). Even once the 3 chat sub-tabs load, the user often takes a while (sometimes up to a couple minutes), to type out their question, so staying on the new chat tab is not usually the best use of agent time.
Desired behavior: When a new chat is accepted, the new chat should load in the background, allowing the agent to continue working on the other chat(s) they have open. The new chat should *not* force the agent to sit there and watch the 3 chat sub-tabs load. After working a little more on the open chats, the agent can check back on the new chat, and see how far along the customer is in composing their question. This is less disrupting to the agent workflow and maximizes agent control and efficiency.
Note: We've been told by the Live Agent PM that this is desired/expected behavior of the product. However, having observed agents in the field using Live Agent over the course of 1 week, I am confident that this is not desired behavior, and it is much preferred that the new chat *not* monopolize focus, and force the agent to sit there and watch the 3 sub-tabs load.
IDEA 3 - 
Allow Direct link to a Process Builder Process
When working with clients and/or other admins I need to be able to reference the specific process builder that I would like them to look at.  Right now the link available to me is the link that displays all of the processes.
Ideally, we should be able to send a link that opens up to the specific process. This could be something similar to what is available in the Service 

IDEA 4 - 
Pardot Merge Prospects via API
Hi All,
I've gone through the pardot API documentation, but have not found anything related to merging/deduplicating pardot prospects through the pardot API. We have a scenario where we are getting a lot of duplicates in our pardot instance. And also we have defined criteria of considering which of these prospects are duplicates.Since this number is huge, we wouldn't want to spend hours manually merging all of these duplicate prospects. Would be glad if Pardot rolls out an additional method within its APIs.
Please vote up this idea if you're facing the same issue.

Sunday, 16 July 2017

[#Blogged]Setup Audit Trail

Salesforce.com keeps an Audit Trail of configuration changes made in the Setup section. This Audit Trail is available for administrators to track recent setup changes. This becomes especially helpful if there are multiple administrators for your organization. 
Steps To View Setup Audit Trial: 
 
Navigate to Setup | Administer | Security Controls | View Setup Audit Trail: 


The preceding screenshot shows the last 20 most recent configuration changes for your organization.The Audit Trail is useful for troubleshooting. Because it captures date/time, you can often trace user issues back to a specific change. For example, if users all of a sudden are being asked to reset their passwords, you can trace that back to a change in password settings.


To download your organization’s full Setup history for the past 180 days, click the Download link. This will give you a CSV file that can be opened in Excel and sorted.

Starting with Winter'16 the SetupAuditTrail object (https://developer.salesforce.com/docs/atlas.en-us.api.meta/api/sforce_api_objects_setupaudittrail.htm) has now been exposed via the Salesforce API's and within Apex via SOQL.

Have a look at Andy in the cloud blog about the SetupAuditTrail object.
Audit Trail key concepts:
You can check Audit Trail for the mentioned section/type of changes:
Administration: This will track sundry administration changes such as vicissitudes in the company information, multiple currencies, users, electronic-mail address changes, profile changes, roles, record types, engendering e-mail footers, and domain name changes.Customization: These vicissitudes are cognate to the interface changes, forecasts, contracts, conceptions, field tracking in victuals, support-cognate settings, process setups, and transmutes to groups.Security and sharing: These are cognate to security settings and sharing, such as password policy changes, session setting changes, vicissitudes in SAML settings, and so on.Data management: These vicissitudes are cognate to the mass expunction of records, data export requests, the mass transfer of records and import wizard utilization, and transmutes in analytic snapshots.
Development: This change is cognate to Apex classestriggers, and Visualforce. Changes can include modifications to triggers, classes or Visualforce; remote site access setup; and Force.com site setup.
Sundry setups: These include sundry setup changes such as the engenderment of an API, utilization metering notifications, territories utilization, workflow and approbations settings, and AppExchange package installation/uninstallation, and engenderment and effacement of workflow actions are additionally tracked.
Utilizing the application: These transmutations are cognate to the vicissitudes in the account team and opportunity team selling settings, Google App accommodations, and the enabling and incapacitating of partner and customer portal users.

Monday, 22 May 2017

[#Blogged] Developer Edition "DE org"

Development and deployment on Force.com typically take place in an environment or org, which provides a number of features and accommodations for applications within that environment. An environment lets you instantly start developing, testing and deploying your app in the cloud. For an explication of the types of environments, optically discern An Exordium to Environments.
Follwing are the salesforce licenses : 
Salesforce Customer Portal
2 Salesforce CRM licenses
2 Salesforce Mobile licenses
3 Salesforce Platform licenses
5 Salesforce Partner licenses
10 Salesforce Customer Portal Manager licenses  

Other Limits for Developer Edition:
5.0 MB of Data Storage
20.0 MB of File Storage ( attachments)
5000 API requests per 24 hours
Any number of applications
A 500 MB bandwidth and 10 minute service request time limits (per rolling 24 hours) 

Developer Edition (often referred to as a "DE org") is a fully-featured development environment with limits on data and users. Developer Edition is used for:


Trailhead - Salesforce's free and fun online learning tool requires Developer Edition.

Development and Testing - If you don't have a sandbox (a copy of your Salesforce production organization), you can use Developer Edition to isolate development and testing.

ISVs - Independent Software Vendors use DE orgs to create managed packages, which may then be released as apps on the AppExchange.


Developer Previews - Sometimes we release new functionality to Developer Edition before other editions, so you can practice with it.


Fun - You can have more than one Developer Edition, so use one whenever you want to mess around and try something new.

How to signup for free developer edition in Salesforce?

1. Open "http://developer.force.com/".

2. Click "Sign Up" button.
3. Fill in the details. Click "Sign me up". 
4. Verify the account in email.
5. Use "https://login.salesforce.com" for login.


Thursday, 18 May 2017

[#Blogged] Different Types Of Sandboxes

Sandboxes :

sandbox is a replica of an engenderment environment utilized for a variety of purposes, commonly including testing and development. Here's how it works: When you engender or refresh (essentially effaces and reconstitutes a sandbox utilizing the same name) a sandbox, a facsimile of the engenderment environment at that point in time is made.


Different types of Sandboxes 


FullSandbox - Plenarily testing changes against authentic data afore promoting to engenderment.  This may include utilizer acceptance testing.  All changes must go through this sandbox.  If multiple admins/developers are working on overlapping areas, this is the place where changes get merged.  Force.com IDE can be habituated to compare changes by separate developers of the same apex code.
Full sandboxes have the same storage limit as your production organization.Once you refresh the Full Copy Sandbox then to refresh it one more time you have to wait for 29 Days.

 Partial Data Sandbox - This is an incipient sandbox type and I am not quite sure what the intention was.  Probably just a more frugal alternative to a full sandbox.  If you have a full sandbox, then partial data sandbox sounds like a good place for utilizer training for incipient features, incipient employees, etc.  Having authentic data can authentically avail with training.  Additionally, possibly a place to work on integration changes since it can hold quite remotely of authentic data.

Partial Data sandboxes have a 5 GB storage limit.
Once you refresh the Partial Data Sandbox then to refresh it one more time you have to wait for 5 Days.

Developer - A place to work through solutions to incipient requisites.  The main conception is to keep arbitrary experimentation out of the full sandbox.  It there are multiple admins/developers, each one should get their own so that they don't trample on each others work (until they deploy to the full sandbox).

Developer sandboxes have a 200 MB storage limit.


Once you refresh the Developer Sandbox then to refresh it one more time you have to wait for 1 Day.


Developer Pro - The main distinction between this and Developer is the amount of data that can be stored.  It additionally prehends some product data from engenderment.  If those two things are paramountutilize this one.  Otherwise, it's interchangeble with Developer.

Developer Pro sandboxes have a 1 GB storage limit.


Once you refresh the Developer Pro Sandbox then to refresh it one more time you have to wait for 1 Day.

Saturday, 13 May 2017

[#Blogged]Time To Upvote -Series (Part 1)

Here we have some idea's which need to be upvoted :

Idea 1 
Make the Manage External User button available in lightning

Currently the Manage External User button and the nested buttons it hosts are not available in the lightning user interface, as a result users have to switch between lightning and salesforce classic to access the functionality, another drawback to lightning as having to toggle back and forth between two different interfaces undermines the value of lightning.  Please make the manage external user button and the nested buttons it hosts available in lightning


Upvote 

Idea 2

Choose Who To Send Flow Fault emails and Process Builder Error Emails to
The notifications currently go to the user who built the flow or process builder.
I am currently in a situation where the original user who created the flows in Sandbox and deployed them is no longer active. I therefore must change his email in order to receive the error messages on existing flows.


Idea 3 
Increase the limit on the number of reports a user can subscribe to
The new report subscription feature is really nice, but only being able to subscribe to 5 reports is not helpful.  Most users who want to subscribe to reports want to do this for at least 10 - 15 reports.  I'm not sure why the limit is hard-coded to be 5 but having a higher limit (like 25?) would be much appreciated.

Upvote 

Idea 4 
Process Builder: Error messages
Process Builder works great, but when there is a validation error or any other error, it doesn't provide the much information to user and user will never know how to resolve that issue.
Admin gets an email for this exception with the proper message, but if we can improve the error messages for the end user also, that would be great.

Thursday, 20 April 2017

[#Blogged] Login Failed in Apex Data-loader


If you are getting a failed to send request error you may need to check the server host Data Loader set. 
Resolution -Whenever you receive the error Failed to send a request to http://localhost/services/Soap/check the following:  1. Go to Settings | Settings and change the server name to https://www.salesforce.com 2. If logging into the sandbox, then the URL is https://test.salesforce.com
Check if your network is using a proxy - Getting the error message, "Failed to send a request to https://www.salesforce.com/services/Soap/u/31.0" typically indicates that you're going through a proxy server resulting in your login attempt from the Data Loader not making it from your local machine to Salesforce servers. If your network is utilizing a VPN, you'll need to include or set your proxy information in the Data Loader settings. We recommend contacting your IT department to get the following pieces of information:
Proxy host
- Proxy port
- Proxy username
- Proxy password settings
Check network connectivity or local machine issues - Review the affected user record's login history. If the Data Loader's login attempt has been recorded, you'll want to check the login attempt status. You'll be looking for login attempts that failed due to:
- Incorrect password
- Login restrictions
- Missing a required security token(For Developer Edition, give password+security token as password. Username is as usual username.)
If you've confirmed that these are correct and the login attempt is still not recorded this is indicative of a firewall, router, switch, or other network related device or connectivity issue that's preventing the Data Loader's login attempt from properly reaching the Salesforce servers.
You may troubleshoot potential network issues by running the network tests outlined in the article, How do I run a ping and traceroute to Salesforce? and reviewing the results as outlined in the article, How to Interpret the Traceroute? to determine whether it may be appropriate to engage your IT or network administration team to investigate or for further assistance.
If you continue to see an issue and have ruled out the above causes you may also try completely uninstalling the Data Loader and Installing Data Loader once again or trying to login via the Data Loader on another machine to potentially identify and/or rule out the behavior being an installation or local machine issue.