![[#Blogged] - Paarth Jolly](https://blogger.googleusercontent.com/img/b/R29vZ2xl/AVvXsEivbQRyDoXas1E4qfP0jEpkR7g7LJ0-ZvxFOXhhOjUWqP1cnZx0UG2BTFcNMlv1loj6WfdM9HKelMRJwkGdjGRb6TA7dCtpqUNKAYp7PqFH5hhpQd6z9VoCAhLcCr_2urDU1uiizWdLSbeR/s1600/SalesforceCertificateLogo.png)
When Do Features Become Available?
Some features in Salesforce Summer ’17 affect all users immediately after the release goes live. Consider communicating these changes to your users beforehand so that they’re prepared.The Salesforce Summer’17 release is now in available under the pre-release program.
Get Better Assistance with the Restyled Lightning Experience Migration Assistant


Salesforce has given the Migration Assistant an easier-to-use, wizard-style interface.Accessing the Migration Assistant in Salesforce Classic is a no-brainer now. From Setup, click Get Started in the Lightning Experience Migration Assistant tile at the top of the menu.
Switch More Users to Lightning Experience
To help, the Switch Users to Lightning Experience tool now displays all users in your org, so you can switch the exact group that you want in one go. The tool also makes it easier to find specific users in the list and to see which users in your org are eligible to switch. This change applies to both Lightning Experience and Salesforce Classic.

Make Lightning Experience - the Only Experience
Ready to move from Salesforce Classic to Lightning Experience without looking back? Just hide the option to switch to Salesforce Classic from your Lightning Experience users so that they stay in Lightning Experience. This feature is new in both Lightning Experience and Salesforce Classic.
Now you can create a permission set and assign it to different profile.
When you enable the permission for your Lightning Experience users, new and existing users see Lightning Experience the next time they log in to Salesforce. And, they no longer see the Switch to Salesforce Classic link.

Ditch Your Mouse
You can now use keyboard shortcuts to maximize your efficiency and speed while working in Lightning Experience.

Navigate to a Record Directly from an Action Success Message
 Access Field History Related Lists in Lightning Experience
 Salesforce has removed the top favorites section from your favorites list to simplify the way you access your favorite pages in Salesforce. Favorites give you instant access to important records, lists, groups, dashboards, and other frequently used pages.
The message now includes the record name as an active link that takes you right to that record
 Access Field History Related Lists in Lightning Experience
Track and display the field history for standard or custom objects, regardless of which Salesforce interface you’re using. If you added the History related list to objects in Salesforce Classic, you can now see it in Lightning Experience.


- Click the Object Manager tab, and select an object from the list
- In the left pane, click Fields and Relationships and then click Set History Tracking
- Select the fields you want to track
- Add that related list to your object’s page layout
Preview Case Details with Case Hovers
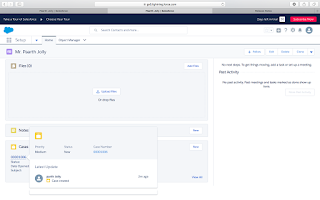
Users can hover over cases to get a sneak peek at the details, including the description and latest update

Users can hover over cases to get a sneak peek at the details, including the description and latest update
Find Favorites with a Simplified Favorites List
 Salesforce has removed the top favorites section from your favorites list to simplify the way you access your favorite pages in Salesforce. Favorites give you instant access to important records, lists, groups, dashboards, and other frequently used pages.

